Friday, June 26, 2009
4th of July...Already
Posted by Unknown at 7:05 AM 2 comments
Labels: 4th of July, cards
Thursday, June 25, 2009
Sneak Peak...
I was going to add a couple pics of something I'm working on, but my camera battery went dead--I will charge it and update it as well as some SVG files that I did from some Precious Moments Coloring pages
Posted by Unknown at 6:29 PM 0 comments
Tuesday, June 23, 2009
Sympathy Card
I made this one for someone my husband works with. If I remember right, her dad died. Sympathy cards are always so hard to make. I chose colors in the mauve family for this and used some stitched dazzles for the big butterfly. I then used the "innie" of the dazzle and ut it onto the darker mauve paper and cut it out and layered them together for even more dimmension. I used Martha Stewart punches on both the borders towards the bottom. I LOVE the lace punch and can't stop using it. I was going to add the sentiment on the front, but I opted for more butterflies instead. I even put some of the wonderful paper on the back. I may still add a couple pearls to the butterflies- I'm just never satisfied! :)
Posted by Unknown at 10:42 AM 1 comments
Monday, June 22, 2009
Organizing and Packing For A Crop
One of the most difficult challenges we face is what to pack for a cropping party. Crops are times for us to get together with others who share the hobby and get some pages done. We socialize and create and gab and snack. Crops are one of the best parts of scrapbooking. We get to enjoy our hobby and our friends at the same time. What fun!
I use the scraprack, so my solution is a little simpler than this method that I found online. For those that want to pack, here are some hints that I found-The dilemma is packing for a crop. How will you know what to bring and what to leave home? You do NOT want to pack everything you own. You'd be shuffling supplies all night and your friends would be giving you dirty looks for hogging all the table and floor space! You want to stay focused and organized. You want to travel as light as possible. How can we do it? Here's help!
When I want to get a lot done at a crop, I pre-pack and I preplan. Crops usually cost something so I feel I want to really use my time wisely. The few minutes it takes to think before I go pays me dividends later tenfold in finished pages!
Plan Ahead and Streamline:
You may take a bin or a tote or a bag to crops. Whether you use one or the other is not as important as whether you PLAN what goes into your supply tote or bin. Take only what you feel you will truly use.
Plan to be simple.
Pack your bag so that you have favored tools like cutters and adhesive as well as any special items you need for specific layouts to be done that day. Make page kits. I place the photos, accents, special papers, and journaling together for each layout set in its own page protector in a binder. Placing your page kits in a "To Do" or "In Progress" binder helps you focus on the goals for THIS crop. You can also use a box and stack page kits in it or use an accordion file. Again, what container you choose is not as important as the actual process of PLANNING AHEAD.
Be Realistic:
I take only as many page kits in my binder as I can realistically get done at a crop. If you know you only get one page done an hour, why even take 12 kits to a 3 hour crop? Guesstimate your regular rate of work and plan accordingly. Toss in one or two more kits than you think you'll finish but be reasonable. Streamline what you take along to work on. Your attitude should be realistic, focused and determined! Determine before you go that you will NOT be a perfectionist and that you WILL get pages completed.
Streamline the Tool Kit:
Most of us have way more tools and goodies than will fit in a tote. So we have to pick and choose what to take along. I keep certain tools in my tote all the time. Others I pack only if I am doing a layout that will need them. We will talk about that more in a minute.>
Be Consistent:
Once you are at a crop, you want to quickly find your tools over and over again. In order to find what you brought along, have a system that makes sense to YOU. Learn to put things away and clean up after each layout is finished. I basically store my items for a crop by type in my tote. Paper in a certain place, adhesive here, punches there, and tools in another spot. Be consistent in where you store your items. After a few crops you will the locations of your tools memorized.
Where's the Paper?
I believe strongly in preplanning page kits and JUST taking them to a crop to work on. When I make up page kits I usually add the paper for that layout in the packet. However I do allow myself some flexibility by carrying along some extra paper choices and colors. This system also gives me a place to stash scraps after each layout until I get them home.
I keep certain tools in my tote all the time. I rarely take these out. To know where things are at, I compartmentalize my tote. On the left side of my tote I keep adhesives of all types. From vellum tape to double sided tape, Hermafix, 3M sheets, Wonder Tape, metal glue and extra Easy Stick adhesive, it's all here on the left side. Clear pockets on a tote make it easy to see right where your supplies are located.
On the front side of my tote I keep my favorite idea book, Becky Higgins Creative Companion. I also keep a laminated timeline guide to my children's ages and grades each year, and several more tools like rubber stamp ABC sets, corner rounder, a small quote book, q-tips for chalking, generic tags, and wire in this flap. On the right side of my tote there is another flap that opens up and this is where I keep all my hand-held punches, a few favorite decorative scissors and my hand held eyelet setter
Pencil Cases are Great Organizers for Smaller Tools:When my plastic paper bin is closed, I store my small tool caddy and pencil boxes along the side. In one pencil case I keep my colored pencils. In another pencil case I keep my Making Memories Rub On ABC's. In a black zipper caddy I keep my little hammer, eyelet setter and mat, stylus, small pliers for wire work, and a sponge clip stick for chalking or inking.

Basic Tool Caddy:
I also have a Cropper Hopper flat pack and I take it everywhere! It holds my absolute basics like a 12 Fiskar Trimmer and my little scissors. It also holds Coluzzle cutters, Easy Stick adhesives, black pens, a fine glue pen, red-eye pen, brown chalk, grey chalk, black ink, a pack of mini buttons, two Quote books, extra blades, and Undo.
With my flat pack at my side, I am ready for any scrap emergency! Sometimes I JUST take my flat pack and my page kits and I am good to go!! You don't have to have this brand of caddy but it will help you if you keep all your most-used tools together for efficiency.
Pens:However I often do like to take my whole tote to a crop. And in the top I keep all my other colored pens. This particular holder came with my tote but if I didn't have one, I would use a large pencil box or plastic hinge-and-lid storage box the size of a small shoebox.
All I add to the top of this tote is my "To Do" Binder. I zip it all inside and off I roll and go!

Have Fun!
You will want to keep your goals focused and your workspace tidy. To get the most possible done at a crop, remember the basic rules of packing up for a scrapbooking party, retreat or convention.
Plan ahead and pack page kits.
Be realistic: you don't need to bring everything with you. And when you scrap, no perfectionism allowed.
Streamline your tools: take your basic tool kit and other tools for the specific pages you plan to do.
Be Consistent and put tools away after use and put them in the SAME place every time. It will save you effort and time in the long run.
Of course, take a little snack (like chocolate) and a bottle of water for refreshment and HAVE FUN!
Posted by Unknown at 2:01 PM 0 comments
Labels: organization, tips
Organization
Idea Books and magazines:
Versus
Posted by Unknown at 9:19 AM 1 comments
Labels: organization, tips
Sunday, June 21, 2009
Birthday Card
Posted by Unknown at 9:16 PM 1 comments
Labels: cards
Stryder's new Seat
We keep Stryders diapers in this little pail. He decided yesterday that he wanted to sit in it and now he keeps dumping the diapers and setting in front of the TV and climbs in. He doesn't want much TV (maybe a total of 30 minutes a day) so it's funny to see him acting this scene out. You can see how small the container is when DH is holding it.
Posted by Unknown at 9:12 PM 1 comments
Labels: Stryder
Friday, June 19, 2009
She's 9!
Posted by Unknown at 1:14 PM 2 comments
Labels: Kasiah
You make me smile...
I made this card for someone that I would consider a "true friend." I met this person on the Paperwishes board and have often gone to her just to talk and she has always been there to listen to my rants. The inside of the card only says "You make me smile." So if you don't want a sneak peak before you get it, don't look any further :-)
+
+
+
+
+
+
+
+
+
+
+
+ I put some crackle over the top of the image to give it an older look. I love how it turned out IRL--
Posted by Unknown at 1:03 PM 1 comments
Labels: cards, glimmer mist
June PaperWishes Card Swap
I decided that I wanted all of the cards in the June PW card swap in one place so I can drool over them. Every single one of them has turned out great--Thanks Mary for the great site for this video!!!!
So here they are so far:
Posted by Unknown at 10:19 AM 5 comments
Labels: June PW Card Swap
Wednesday, June 17, 2009
Making Slide Mount Shadow Boxes
What you'll need:
foam tape
slide mounts
memorabilia
crafting knife or scissors
glue
pattern paper (optional)
Transparencies or sheet protectors
Okay so you have a few bulkier items you just cant part with or convert to picture. And they just have to be included in your book, say a hospital band from a child's birth, or a necklace that your child made. Here's a super fast, fun and easy way to include them.
Use a shadow box. Shadow boxes are simply a box lifted off the page, allowing things to be placed on the inside.
So lets get started.
1. First you'll need to cut the slide mount in half. If you choose to use a plastic slide mount, you may have to pull the two sides apart. What you want is only one side.
2. Now take your glue and glue down the transparency to one side of the slide mount half. Let dry completely. Once dry, yo can cut away any extra transparency hanging off the outside of the slide mount. DO NOT cut away the inside portion.
3. You can now decorate the opposite side of the slide mount half that you glued the transparency to. If you wish not to decorate, skip to next step.
4. Now apply foam tape to the side of the slide mount that the transparency was glued to. DO NOT take off outside paper to the tape. Otherwise you had better know where your box is going. :)
5. Now that you have your top to the shadow box, you'll want to figure out where it will go on your page. Once that is done, I suggest drawing a faint line with a pencil around the box, so you'll remember.
6. OPTIONAL: You can now glue a small piece of patterned paper to the spot where you wish to place the shadow box. Make sure the paper is the same size as the shadow box. It's also helpful if the paper contributes to the page, but is completely different to any other papers on the page. This will help to bring your eyes to focusing on the box.
7. Place and secure (however you wish) your memorabilia to the area that will become the inside of the shadow box. This will be where you put the paper down in step 6. Make sure that none of your memorabilia extends past the inside edges of the shadow box top.
8. Peel off paper on foam tape and carefully press shadow box top down.
9. Wipe sweat off brow, and admire your handy work. Congratulations. You have successfully created a mini shadow box. ;)
TIP: These instructions can be altered to fit any size o box you need for your pages. So if the slide mounts are too small, create a larger slide mount on your own and go from there. :)
Good luck.
Posted by Unknown at 9:17 PM 1 comments
Labels: shadow box, tutorial
Tuesday, June 16, 2009
Spellbinders Die in the Cuttlebug
How to Use a Spellbinders Die in the Cuttlebug:
Cutting Sandwich
1. A plate
2. C plate
3. Spellbinders die, blade side up
4. Paper or cardstock
5. B plate
6. Roll through Cuttlebug
Note: You will also require the Spellbinder Tan embossing Mat to emboss with Spellbinder dies- available separately
I do not have any spellbinders, but I'm sure with practice you can use other mats as described on other tutorials I have done with the cuttlebug.
Please be careful and do not force anything through.
Posted by Unknown at 1:15 PM 0 comments
New technique- Photo Corners
I found some interesting ideas in a book called Creativity Tips for Scrapbookers, made by Creative Keepsakes and thought I would share...
Photo Corners As Objects
Repurpose the shape of photo corners to create other things, such as Flower Blooms and Leaves
1. Stick photo corners pointing in towards each other onto die cut tag background in the shape of a flower. Each corner is like a petal for the bloom.
2. Add brad to flower center.
3. Fold larger photo corner in half, but slightly askew as seen in sample picture. Temporarily affix it to tag.
4. Backstitch a stem with embroidery floss.
Photo Corners As Arrow Heads
Turn the shape on its side and add a stem for fun, dimensional arrows.
1. Fill center area of base patterned paper with adhesive. Scrunch sewing pattern tissue and attach to paper. You can make it as flat or as rumpled as you choose!
2. Cut a large heart out of second patterned paper piece and ink edges. Attach this and the photo to the top of the tissue paper.
3. Journal onto your Heidi Swapp labels and then affix to heart center and base of photo. Trace around the labels with a pen and then a line of glitter glue.
4. Paint over metal photo corner to match your page. Let dry, and sand to distress.
5. Affix metal corner to page as shown and then affix ribbons "flying" from the "arrow head".
MORE PHOTO CORNER THOUGHTS:
* Look for photo corners in metal, paper, acrylic, chipboard, as rubber stamps, and even as a font here at 2Peas! Use your imagination in tailoring these mediums to your needs!
* Use photo corners to accent blocks of patterned paper or cardstock on your layout.
*Go retro and classic with a black page and black photo corners to highlight your important photos.
*Make a border the entire length of your page with happy little photo corners all in a row. :)
*Trace photo corner shapes onto patterned paper and cut to create personalized embellishments
Posted by Unknown at 8:44 AM 2 comments
Labels: photo corners, technique tuesday
Beach Pics
Monday, June 15, 2009
Updates
After some calling to the hospital and doctors, we fially got the results today. The first answer, the nurse said she was not suppposed to say, but he did not have CF, but the DR. still needed to talk to us. Great NEWS! Although I knew he was okay, it's still pretty nerve wracking not knowing for sure. The Dr. is still concerned about his weight and wants us to see about fattening him up and seeing him at the end of July. This ought to be fun!!!
I am finally feeling better too. We went to the beach yesterday. The water was so warm, not what I am used to as the Oregon Coast waters are never warm, even in the middle of the summer. Yesterday was a much needed break away from the stress of life and it was the first day in a while that I could leave the 20ft perimeter of the bathroom. I will post some pics later (I forgot the camera in the car).
Posted by Unknown at 3:53 PM 2 comments
Labels: Stryder
Saturday, June 13, 2009
Ultimate Crafter's Companion
The Ultimate Crafters Companion is everything you will ever need for your card making and paper craft projects in one handy and portable carry case. It builds on the features of the award winning Top Score and Enveloper tools, and is designed to take your crafting onto the next level by providing an array of crafting utilities at your fingertips. Perfect for creating professional looking cards in a variety of imaginative styles: Pop out, K-card, embossed and classic. It was also designed to create boxes, trim paper, make envelopes, make bows, and even store your projects in progress. Also included is a video tutorial DVD. Constructed of durable plastic with a double-hinge system that allows this unit to lie completely flat, giving you approximately 14" x 23" of work surface. Everything stores quickly and easily inside, so you can fold-n-go or fold-n-store in a hurry.
I had the crafters companion enveloper and also the topscore both and yet, I LOVE this one even more! I have made a few cards since recieving it and have used it for all of them-either with the bow maker, folding or envelope. The cutter is a small utility blade in an enclosed mechanism, so replacements should be easy and cheap.
I did look up some other reviews and this is what people said:
4/5 I am using this product for my daughters engagement party for her favors. Great for making end of year gifts for teachers, etc. You can take it with you outside or if you are going on a trip.
I just wish they gave you more video projects and maybe one more board of designs, a heart and butterfly is very limited
5/5 I have made boxes, scallop edged tri fold cards, and envelopes. I am looking forward to doing a lot more with it. It is user friendly. I only wish the accessories would stay in place better than they do if you open it upside down.
1/5 Although the concept of this tool is great, the execution is awful. You spend more time trying to put the thing back together than you will spend using it. Every time you open it to use it, the hindges that hold it together come off. The tools fall out every time you open it. Some people may find ways around that, but should you have to? You spent your hard earned money on it, it should work as it is suppose to with out any modifications.
2/5 This would be better if it had a ruled score line base. Sometimes I just need to score at 1" or 2" and this doesn't have that feature. The CD is good and easy to follow, but I just need the basic ruled score lines as well.
4/5 The actual boards are solid strong plastic, it is the hinges,closure, and tools that I have an issue with. When the hinges and closure finally break, I'm sure it will be soon, I will use velcro strips to keep it together.
The actual boards are great! Easy to use, makes folds perfectly. Love the box maker, it makes it so easy to construct different size boxes with lid that fits perfectly.
I would buy again, but would realize that it is for the actual boards, not for the additional features.
4/5 I use this mostly to make cards. The DVD that comes with it has some great ideas for making unique cards and mini books. I haven't had a chance to do them all yet, but the ones I have tried were relatively easy with a little practice. My major gripe with this board is it's a bit clumsy, the hinges sort of move around making it a little difficult to handle. Also, the tools which are stored in the board do not click in and fall out whenever I open it- annoying, but not enough that I wouldn't buy it again. I think I'll try some velcro to solve the problem. Don't buy this for the cutter as it is a cheap plastic thing with a straight blade. Stick with a regular trimmer.
5/5 I use the crafters companion for cards, scrapbooking, and making envelopes. Everything is just so handy and well thought out. The DVD that came with the tool is just wonderful with very specific directions and lots of ideas on how to use product. I'm glad I bought the crafters companion and would recommend it to any papercrafter, it just makes everything so easy.
As of todays date, you can get the crafters companion at Ritz Camera for 46.99 + Shipping-- I did hear of their sister site that offers free shipping though. The site http://www.scrapbookingalley.com/
Posted by Unknown at 5:06 PM 0 comments
Labels: review, ultimate crafters companion
Friday, June 12, 2009
Digi stamps using Microsoft Word
Go to Insert, click on Picture, then Clip Art.
In the Search Box, type the theme of clip art that you want to access, for example: flowers or butterflies.
From the Search, click on the picture that you want to insert in your document.
Now, double-click on the picture. The picture will be selected and you can format it.
If you have Word 2003, you are going to see the Format Picture toolbar appear when you double click on the picture. If you have Word 2007, you will be able to access the Adjust group from the Format tab.
Now, you can change the look of your clip art by using Recolor (2007) and converting the image to Black and White.
Print this image and color it with your favorite markers, pencils, etc. Also, you can leave the colors or change them using the different options in Recolor if you are using 2007.
Posted by Unknown at 9:47 AM 2 comments
Labels: tutorial
Thursday, June 11, 2009
Watercoloring and embossing
I wanted to try a new technique yesterday and it came out so good on my card, I thought I would do a sort of tutorial on it. I haven't used my Martha WWatercolors in a while, but found out through some videos that they work well with an aqua painter. Basically, it's a paintbrush with water inside. I wanted to see if I embossed each color seperately if it would give a good outlined dark color but not be too much- it worked out great! Listed above are the tools that I used, including my embossing markers, powder, Marth markers, embossing gun, a zig marker, scrap paer to wipe the aqua brush off and my printed design. I started of using my zig marker and just outlining the image. I didn't do this carefully, just wanted a sort of drawing look.
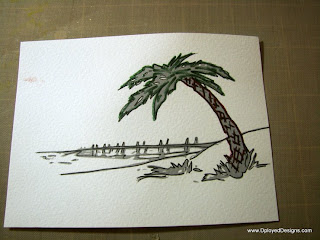
I then used my dark green and brown embossing marker and outlined the tree, and then used my heat gun to emboss it after putting the clear embossing powder on top.
I did the same thing with the sand and grass using the lighter brown and green colors. I also did the blue water and ripples.
I used my Martha "Putty" and made two lines under the embossing brown.
Using my Aqua Painter, I spread out the brown down to the grass.
I did the tree here with Chestnut and Evergreen markers
The grass was using the Glade color marker, spreading it with water and wiping clean after each color.
I used Cornflower for the water, just coloring around the outlines and finishing with the aqua painter.
I used Cornflower on the top of the pier and also on top of the sand dune.
If you noticved in teh top pics, I had a finger print on the left side, I just cut it off and inked the edges to make sure that it would still look okay :)
Now the finishing touches- I added some more Putty under the grass.
Inked the edges and blended the sand some more and here is the finished design. On my original one, I sprayed it with glitter mist, but it took a long time to dry and I didn't want to wait this time around :)
Posted by Unknown at 3:55 PM 1 comments
Labels: embossing, tutorial, watercoloring


